How to Install Swing Check Valves
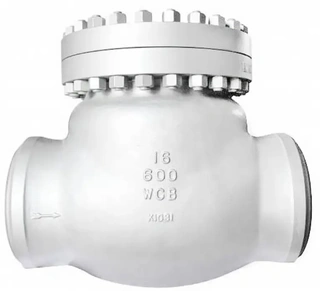
Swing check valves are vital components in piping systems, designed to ensure unidirectional flow and prevent backflow. These valves operate using a hinged disc, often called a “flap,” which opens when fluid flows in the correct direction and closes automatically when flow stops or reverses. This simple yet effective mechanism safeguards system integrity, prevents contamination, and maintains consistent operation.
In household plumbing, the role of swing check valves is particularly noticeable. Without a check valve, wastewater from sinks, showers, or flushing toilets could flow backward into clean water lines, causing serious hygiene issues. In industrial and commercial applications, backflow can damage equipment, reduce system efficiency, or compromise safety. Consequently, swing check valves are indispensable across residential, commercial, and industrial piping systems.
Can Swing Check Valves Be Installed Vertically?
Swing check valves can be installed both horizontally and vertically. However, careful attention must be paid to installation orientation and details, as improper installation can compromise valve performance or even cause system failure.
A common point of confusion is the meaning of “vertical installation.” Some assume it refers to the valve body being vertical on a horizontal pipeline. However, in professional piping terminology, vertical installation usually means the valve is installed in a vertical pipe, with fluid either flowing upward or downward. This guide follows the latter definition, focusing on installation within vertical piping.
Differences Between Horizontal and Vertical Installation
Horizontal Installation: Horizontal installation is the most common method for swing check valves. In this configuration, the valve body stands upright while fluid flows horizontally through the pipe. This orientation allows the valve disc to close naturally under gravity, improving sealing performance and reducing wear on internal components. Horizontal installation is generally easier to maintain and offers consistent performance for a wide range of system pressures and flow rates.
Vertical Installation: Vertical installation is permissible only if fluid flows upward through the pipe. In this setup, the valve body lies horizontally, and the disc opens when fluid pushes upward, then closes under gravity and reverse pressure when the flow stops. Vertical installation is often required in systems where horizontal space is limited or specific pipeline layouts dictate it. However, strict adherence to installation guidelines is critical. Improper vertical installation, such as in a downward-flowing pipeline, can result in valve failure, water hammer, and system damage.
Proper Installation Procedure for Swing Check Valve
A thorough understanding of the swing check valve’s working principle and orientation requirements is essential for correct installation. Proper installation not only ensures reliable valve performance but also prolongs service life, reduces maintenance costs, and enhances system safety.
1. Preparation Before Installation
- Confirm Valve Specifications: Measure the pipeline diameter and ensure that the valve size matches the pipe. Additionally, check material requirements. Common materials include carbon steel, stainless steel, and PVC. Selection should depend on fluid type and operating conditions—for example, stainless steel for corrosive media or PVC for domestic water systems.
- Inspect Internal Condition: Debris may enter the valve during transportation. Open and inspect the valve prior to installation, removing any foreign material that could obstruct the disc. Even small particles can prevent proper closure, leading to leaks or system malfunction.
- Check Connection Surfaces: Inspect the valve’s connection ends for flatness, scratches, or other defects. Imperfections may compromise sealing and cause leaks. Replace or repair defective valves before proceeding.
- Prepare Tools and Materials: Gather appropriate tools based on connection type: pipe wrenches, PTFE (Teflon) tape, thread sealant, and a level. Ensuring that all tools are ready prevents interruptions during installation and minimizes the risk of errors.
2. Step-by-Step Installation
- Determine Flow Direction: Swing check valves have flow arrows on the body to indicate correct installation. Verify the actual flow direction of the system and ensure the valve arrow matches it. Installing a valve in the wrong orientation can prevent operation, cause backflow, and damage the system.
- Select Installation Position: Horizontal installation is preferred. If vertical installation is required, ensure upward flow. Never install swing check valves in vertically downward pipes, as this can prevent proper closure and defeat the check function.
- Prepare Pipe Ends: Clean the pipe ends thoroughly, removing burrs, rust, and debris. For threaded connections, inspect threads; for flanged connections, ensure that sealing surfaces are flat and smooth. Use specialized tools if needed to repair or adjust ends.
- Apply Sealant: For threaded connections, wrap PTFE tape or apply thread sealant. In high-pressure systems, using both can improve reliability. Wrap PTFE tape in the same direction as thread tightening to prevent it from unraveling during installation.
- Install the Valve: For threaded connections: hand-tighten first, then use a wrench with moderate force. Over-tightening can damage threads or the valve body. For flange connections: tighten bolts evenly in a cross pattern to ensure uniform gasket compression.
- Adjust Valve Position: Ensure the hinge pin is on top for horizontal installations so the disc closes naturally. Use a level to confirm alignment and avoid disc misalignment that could affect sealing.
- Leave Sufficient Operating Space: Maintain 1–2 times the pipe diameter around the valve to allow free disc movement, facilitate maintenance, and avoid interference with nearby piping or equipment.
3. Water Flow Testing
After installation, perform a water flow test to verify valve operation:
- Check that fluid passes smoothly through the valve.
- Inspect all joints for leaks.
- Verify that the disc opens and closes freely without obstruction.
- Listen for abnormal noises that may indicate misalignment or debris.
If flow is restricted or irregular, confirm the correct orientation of the valve. Detecting issues during installation is far easier than after the system is operational.
Special Considerations for Vertical Installation
Although swing check valves can be installed vertically, the following guidelines must be strictly observed:
1. Flow Must Be Upward
Ensure fluid flows from the bottom to the top. Downward flow can prevent the disc from closing, rendering the valve ineffective.
2. Avoid Downward Flow Installation
Installing in downward vertical pipelines can lead to serious problems:
- Disc may remain open permanently.
- Backflow prevention is compromised.
- Sudden fluid stoppage may cause the disc to slam shut, generating water hammer.
- Water hammer can damage both the valve and pipeline.
3. Hinge Positioning
Even in vertical installations, the hinge pin should ideally be positioned to facilitate disc closure. Adequate space around the valve optimizes sealing performance and reduces stress on the disc.
Routine Maintenance of Swing Check Valves
While swing check valves require minimal maintenance during normal operation, regular inspection increases reliability and prolongs service life. Incorporate check valve inspection into routine system maintenance.
1. Regular Inspection Items
- Leak Check: Inspect all seals and cover joints. Tighten bolts or replace gaskets as needed. Leaks may indicate worn components requiring further inspection.
- Visual Inspection: Look for corrosion, mechanical damage, or material aging. Metal valves may suffer from rust that weakens structure and sealing; plastic valves should be checked for cracks or brittleness.
- Debris Accumulation: Inspect the disc and seat for debris that may obstruct operation. Remove buildup promptly to maintain smooth operation.
- Flow Direction Verification: Ensure valve orientation remains correct and markings are visible, especially after system modifications.
2. Maintenance Procedures
- Cleaning: Remove dust and external debris; internal cleaning can be done during system downtime to remove scale or accumulated sediment.
- Lubrication: Apply suitable grease to the hinge to maintain smooth disc movement. Avoid lubricants that react with the fluid medium.
- Functional Testing: Regularly test disc opening and closing by observing the system response to flow changes. Ensure that the disc closes fully when flow stops.
Additional Practical Tips
Avoid High-Velocity Turbulence: Installing check valves immediately after pumps or elbows can create turbulence, affecting disc movement. Install at a minimum recommended straight pipe distance upstream and downstream.
Temperature and Pressure Considerations: Ensure that the valve material and rating match system conditions. High-temperature fluids can affect plastics, while high-pressure fluids require robust metal valves.
Water Hammer Protection: Consider installing slow-closing check valves or adding air chambers to reduce the risk of water hammer, especially in vertical pipelines.
Accessibility: Ensure that valves are installed where they are easily accessible for inspection and maintenance, particularly in industrial settings where frequent monitoring is necessary.
Conclusion
Swing check valves are crucial components in any piping system. Correct installation and routine maintenance are vital to prevent backflow, minimize system damage, and ensure long-term reliability. Key takeaways include:
- Swing check valves can be installed horizontally or vertically, but vertical installation requires upward flow.
- Horizontal installation is preferred for natural gravity-assisted closure.
- Always follow flow direction markings and ensure hinge pins are properly positioned.
- Prepare fully before installation—verify specifications, inspect internals, and gather necessary tools.
- Conduct routine inspections for leaks, corrosion, and debris accumulation.
- Address any faults promptly with targeted solutions.
By following these guidelines, swing check valves will operate efficiently and reliably, protecting pipelines and systems in residential, commercial, and industrial applications. Adherence to these best practices ensures optimal performance, reduces maintenance costs, and prolongs the valve’s service life.
Send your message to this supplier
Related Articles from the Supplier
How to Install Swing Check Valves
- Mar 23, 2026
How to Install a Threaded Needle Valve
- Mar 20, 2026
How to Properly Install Steam Traps: Complete Guide
- Dec 24, 2025

How to Choose Valves for the Chemical Industry
- Jan 13, 2025
How to Prevent Leakage in Steam Trap?
- Sep 18, 2025
How to Choose the Right Plug Valves?
- Oct 15, 2025
How to Choose the Appropriate Check Valves?
- Oct 21, 2025
Related Articles from China Manufacturers
How to Install and Use Smart Vending Machine Locks?
- Jul 20, 2023
How to Install Electric Control Butterfly Valve
- Oct 13, 2014
How to Install Electric Hydraulic Control Valve
- Oct 28, 2014
How to Install a Cam Lock?
- May 09, 2020

How to Install and Maintain Pneumatic Ball Valves?
- Aug 27, 2022
How to Install and Use Weld Neck Flanges?
- Mar 05, 2024

Related Products Mentioned in the Article
Zhejiang Kosen Valve Co., Ltd.
- https://www.kosenvalve.com/
- Business Type: Industry & Trading, Manufacturer,
Supplier Website
Source: https://www.kosenvalve.com/media-hub/how-to-install-swing-check-valves.html