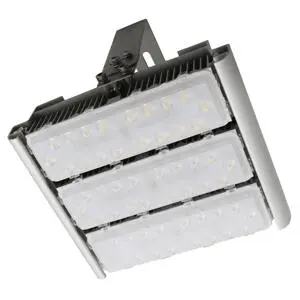
Modular LED tunnel lights


Key Specifications / Features
The High power LED tunnel lights adopt Modular design and Aluminum alloy housing with IP68 production which enable excellent resistance to corrosion. The glareless lighting design with Ergonomic lighting distribution makes sure uniform illuminating effect which is vital important for driving in tunnels.
Request a quote
Detail Information
Modular LED Tunnel light with High power

Features:
Modular design, pluggable technology, easy-tool onsite maintenance
Honeycomb briquette burning effect, Integral cooling technology
Double-coupling IP68 protection, highest waterproof level
Lumen maintenance of L70 at 50,000 hours, significantly reduce maintenance cost
Ergonomic lighting distribution to achieve uniform illuminating effect, special designed for tunnel lighting
Free modular serialization, various power solutions
Special Technical Advantages:
Honeycomb Briquette lighting effect
It simulates and adopts the burning principle of honeycomb briquette; it is easy to transform the original block of radiator to various modules, as well as to enable air to convect and fully pass through the gaps between modules by utilizing the honeycomb effect, thus to remove the heat rapidly, and reduce temperature by around 20 ℃.

Integral Heat dissipation
It makes clever use of module bracket that only play a supporting role, and to transform it to a “thermal bracket” that is capable of conducting the module’s heat to the light shell as a structural part, thus to enhance cooling effect of radiator of cooling module. The design aims to fully utilize the surface area of structural parts to transfer heat to air.

Tool-free maintenance
Using special structural design to enable manual disassembly and installation of lighting components, convenient and safe.

Double-coupling IP68 protection
It adopts the screw-free structure to avoid the penetration of water vapor through the screw hole; its double silicon-rubber rings insulate LEDs with the outside environment completely, thus to eliminate the possibility of any erosion to chips and PCB boards from outside.

High-efficacy LED Light source
It adopts Lumileds LUXEON T LED source with super efficacy and light output from a compact source. Optimized for efficacy driven applications with typical Vf: 2.7V and low thermal resistance: 3K/W. Specified, targeted and tested hot, at real world operating temperatures, Tj=85℃ to ensure in- application performance.

Free Serialization
It is available to freely equip with different numbers of modules to achieve different power according to the needs.

Electrical and Photometric Specification
Mechanical and Environmental Specification
Lighting Distribution

Drawing

Drawing of Mounting Bracket

Installation

Step 1: Mount the light to the wall with screws at the mounting holes on the bracket;
Step 2: Connect the wires to the AC wires. (The earth wire should be reliable and linked to the ground);
Step 3: Adjust the angle of the bracket.
Maintenance

Step 1: Unscrew the 4 x set screws on the main beam covers at both sides and remove the 2 main beam covers.
Step 2: Loosen the screws at both ends of the failed module(s) and pull out the module (s).
Step 3: Disconnect the waterproof connectors, remove the module(s) and replace the failed module(s) with qualified one(s);
Step 4: Connect and tighten up the waterproof connectors, install the module (s) back, close the main beam covers both sides and tighten the screws on them.

Features:
Modular design, pluggable technology, easy-tool onsite maintenance
Honeycomb briquette burning effect, Integral cooling technology
Double-coupling IP68 protection, highest waterproof level
Lumen maintenance of L70 at 50,000 hours, significantly reduce maintenance cost
Ergonomic lighting distribution to achieve uniform illuminating effect, special designed for tunnel lighting
Free modular serialization, various power solutions
Special Technical Advantages:
Honeycomb Briquette lighting effect
It simulates and adopts the burning principle of honeycomb briquette; it is easy to transform the original block of radiator to various modules, as well as to enable air to convect and fully pass through the gaps between modules by utilizing the honeycomb effect, thus to remove the heat rapidly, and reduce temperature by around 20 ℃.

Integral Heat dissipation
It makes clever use of module bracket that only play a supporting role, and to transform it to a “thermal bracket” that is capable of conducting the module’s heat to the light shell as a structural part, thus to enhance cooling effect of radiator of cooling module. The design aims to fully utilize the surface area of structural parts to transfer heat to air.

Tool-free maintenance
Using special structural design to enable manual disassembly and installation of lighting components, convenient and safe.

Double-coupling IP68 protection
It adopts the screw-free structure to avoid the penetration of water vapor through the screw hole; its double silicon-rubber rings insulate LEDs with the outside environment completely, thus to eliminate the possibility of any erosion to chips and PCB boards from outside.

High-efficacy LED Light source
It adopts Lumileds LUXEON T LED source with super efficacy and light output from a compact source. Optimized for efficacy driven applications with typical Vf: 2.7V and low thermal resistance: 3K/W. Specified, targeted and tested hot, at real world operating temperatures, Tj=85℃ to ensure in- application performance.

Free Serialization
It is available to freely equip with different numbers of modules to achieve different power according to the needs.

Electrical and Photometric Specification
| Model | Input Voltage (V) |
Driving Current (mA) | Power (W) | Luminous Efficacy (lm/W) |
Flux (lm) |
Power Factor | PF | Lighting Distribution | LED Brand | CCT (K) | CRI |
| HC-TS2C-1 | AC100-277 | 700 | 40 | 110±5 | 4400±400 | 0.95 | 89% | Type I Tunnel Light 110° |
Lumileds Luxeon T | 3000,4000, 5000,5700 |
>70 |
| 860 | 50 | 105±5 | 5250±500 | ||||||||
| 1050 | 60 | 100±5 | 6000±600 | ||||||||
| HC-TS2C-2 | AC100-277 | 700 | 80 | 110±5 | 8800±400 | 0.95 | 91% | Type I Tunnel Light 110° |
Lumileds Luxeon T | 3000,4000, 5000,5700 |
>70 |
| 860 | 100 | 105±5 | 10500±500 | ||||||||
| 1050 | 120 | 100±5 | 12000±600 | ||||||||
| HC-TS2C-3 | AC100-277 | 700 | 120 | 110±5 | 13200±600 | 0.95 | 91% | Type I Tunnel Light 110° |
Lumileds Luxeon T | 3000,4000, 5000,5700 |
>70 |
| 860 | 150 | 105±5 | 15750±750 | ||||||||
| 1050 | 180 | 100±5 | 18000±900 | ||||||||
| HC-TS2C-4 | AC100-277 | 700 | 160 | 110±5 | 17600±800 | 0.95 | 91% | Type I Tunnel Light 110° |
Lumileds Luxeon T | 3000,4000, 5000,5700 |
>70 |
| 860 | 200 | 105±5 | 21000±1000 | ||||||||
| 1050 | 240 | 100±5 | 24000±1200 |
Mechanical and Environmental Specification
| Model | Working | Lumen Maintenance (h) | Housing Material | Protection for Break |
Product Size | Packing Size | N.W (kg) |
G.W (kg) |
| Environment | (mm) | (mm) | ||||||
| HC-TS2C-1 | ‘-40℃~+50℃, 10%~90%RH |
>50000 | Aluminum Alloy | 10KV | 360*260*95 | 430*330*230 | 3.3 | 4.3 |
| HC-TS2C-2 | 360*260*175 | 430*370*230 | 4.8 | 5.9 | ||||
| HC-TS2C-3 | 360*260*255 | 430*410*230 | 5.6 | 6.7 | ||||
| HC-TS2C-4 | 360*260*335 | 450*430*230 | 6.7 | 8 |
Lighting Distribution

Drawing

Drawing of Mounting Bracket

Installation

Step 1: Mount the light to the wall with screws at the mounting holes on the bracket;
Step 2: Connect the wires to the AC wires. (The earth wire should be reliable and linked to the ground);
Step 3: Adjust the angle of the bracket.
Maintenance

Step 1: Unscrew the 4 x set screws on the main beam covers at both sides and remove the 2 main beam covers.
Step 2: Loosen the screws at both ends of the failed module(s) and pull out the module (s).
Step 3: Disconnect the waterproof connectors, remove the module(s) and replace the failed module(s) with qualified one(s);
Step 4: Connect and tighten up the waterproof connectors, install the module (s) back, close the main beam covers both sides and tighten the screws on them.


