Critical Methods for Forging Defect Detection
In the field of industrial manufacturing, forgings are indispensable foundational components of many important pieces of equipment. Whether it is the crankshaft of an automobile engine, the blades of an aerospace engine, or the gears of large machinery, high-quality forgings are essential. However, due to the complexity of the forging process, forgings are prone to various internal and surface defects during production, such as cracks, inclusions, porosity, and shrinkage cavities. If these defects are not detected and addressed in time, they may cause equipment failures during operation or even lead to safety accidents. Therefore, strict inspection of forgings is a key step to ensure safe equipment operation and extend service life.
Common Defects in Forgings
Forgings are made by deforming ingots or billets under the pressure of a forging hammer or mold to form blanks of certain shapes and sizes. During the forging process, various defects can easily occur. These defects mainly originate from two sources: one is defects present in the ingot; the other is defects generated during the forging process. For example, shrinkage cavities are defects formed at the head of an ingot as it cools and contracts and may remain if the head is not sufficiently cut off during forging, commonly seen at the head of shaft forgings. Shrinkage porosity forms during ingot solidification contraction and may not be eliminated due to insufficient deformation during forging.
Inclusions can be classified according to their origin or nature into internal non-metallic inclusions, external non-metallic inclusions, and metallic inclusions. Internal non-metallic inclusions are the reaction products of deoxidizers, alloying elements, or gases contained in the ingot, usually small in size, floating on the molten metal, and eventually gathering in the center and head of the ingot. External non-metallic inclusions are refractory materials or impurities mixed during smelting or casting, generally larger in size and often located in the lower part of the ingot. Metallic inclusions result from large amounts of alloy added during smelting or small splashes or foreign metals entering during casting.
Cracks in forgings have diverse causes. According to their formation, cracks can be generally divided into: cracks formed by the expansion of metallurgical defects (such as residual shrinkage cavities) during forging; cracks caused by improper forging processes (such as excessively high heating temperature, rapid heating, uneven deformation, excessive deformation, or improper cooling); and cracks formed during heat treatment. For example, high heating temperature during quenching may cause coarse structures and generate cracks during quenching; improper cooling can lead to cracking; delayed or improper tempering can produce cracks caused by residual stresses inside the forging.
In addition, there are special defects such as folds and white spots. Folds occur when protruding parts of hot metal are pressed and embedded into the forging surface, often at inner corners and sharp edges. The oxide layer on the fold prevents metallurgical bonding at that location. White spots are small cracks in steel forgings caused by the presence of hydrogen, which greatly affect the mechanical properties of the steel. When the white spot plane is subjected to stress perpendicular to its orientation, it can lead to sudden fracture of the steel. Therefore, white spots are not allowed in steel. They mostly appear in high-carbon steel, martensitic steel, and bainitic steel, while austenitic steel and low-carbon ferritic steel generally do not have white spots.
Characteristics of Forging Defects and Detection Methods
The characteristics of defects in forgings are closely related to their formation process. During forging, the ingot's structure elongates along the metal deformation direction, forming fibrous structures commonly known as metal flow lines. The flow line direction generally represents the main direction of metal extension during forging. Except for cracks, most defects in forgings, especially those caused by ingot defects, are often distributed along the metal flow line direction, which is an important feature of forging defects.
To detect defects in forgings, contact or immersion methods can be used. With the development of computer technology and increasing recognition that immersion methods facilitate automation, reduce human factors, and ensure high detection reliability, immersion testing is increasingly applied to important forgings requiring high resolution, sensitivity, and reliability. Forgings have fine microstructures, causing relatively low ultrasonic attenuation and scattering, allowing higher detection frequencies (such as above 10 MHz) to achieve high-resolution detection and identify small defects.
Due to deformation during forging, defects generally have directionality. Typically, the distribution and orientation of metallurgical defects are related to the forging flow lines. Therefore, to achieve the best detection results, the selection of the incident surface and direction of the ultrasonic beam should consider the forging process and flow lines, and the ultrasonic beam should ideally be perpendicular to the flow lines. For die forgings, the deformation flow lines are parallel to the outer surface, so ultrasonic beams are usually required to be perpendicular to the outer surface, and scanning is conducted along the surface shape, often using immersion methods or water-coupled probes.
Main Methods of Forging Inspection
Next, we will discuss the main methods of forging inspection. These methods play a crucial role in industrial manufacturing and can effectively detect various defects in forgings, ensuring their quality and safety.
1. Magnetic Particle Testing (MT)
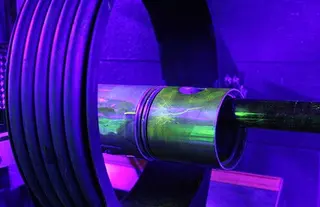
Magnetic particle testing is a commonly used method for forging inspection. Its basic principle is to use a magnetic field to cause magnetic particles to accumulate at defect locations, forming magnetic indications and revealing defect positions and shapes. MT is simple to operate, fast, and highly sensitive, particularly suitable for detecting surface and near-surface defects in ferromagnetic materials. During MT, the forging is typically magnetized longitudinally and circumferentially to ensure full detection of defects. Different magnetization methods and types of magnetic particles can be selected based on the forging's shape and size to improve detection accuracy and efficiency.
2. Ultrasonic Testing (UT)
Ultrasonic testing is another important method for forging inspection. It uses the propagation characteristics of ultrasonic waves in materials to detect reflections, refractions, and scattering at defects, allowing determination of their location, size, and nature. UT has a wide detection range, high sensitivity, and accurate defect localization, particularly suitable for detecting internal defects in forgings. During UT, the selection of probes, frequencies, and detection parameters depends on the forging's material, shape, and defect type. Careful analysis of results is required to ensure accuracy and reliability. Common ultrasonic techniques include longitudinal straight-beam testing, longitudinal angle-beam testing, and shear-wave testing. For complex forging shapes, both longitudinal and shear-wave testing may be applied to detect defects of different orientations, with longitudinal straight-beam testing being the most basic method.
3. Penetrant Testing (PT)
Penetrant testing is a non-destructive method based on capillary action, particularly suitable for detecting open surface defects. The forging surface is thoroughly cleaned, penetrant applied, excess removed, and developer applied. Under specific lighting, dye traces reveal the position and size of surface defects. PT is simple, fast, and sensitive to small defects but only suitable for detecting open surface flaws.
4. Radiographic Testing (RT)
Radiographic testing uses X-rays or gamma rays to perform through-inspection of forgings. Radiation penetrates the material and produces different transmission and scattering at defects. Analyzing these phenomena allows determination of defect position, size, and nature. RT has a large detection range and precise defect localization but involves radiation hazards, requires strict protection measures, is costly, and demands high operator expertise.
5. Other Inspection Methods
Other methods, such as eddy current testing and acoustic emission testing, also have application value under specific conditions. Each inspection method has its applicable scope and limitations, requiring consideration of material, shape, defect type, and inspection requirements when choosing the appropriate method.
Importance of Comprehensive Inspection
In practice, multiple inspection methods are often combined to ensure forging quality and safety. By comparing results from different methods, a more complete understanding of internal and surface conditions is obtained, allowing timely detection and handling of potential defects. For example, for large and complex forgings, ultrasonic testing may first detect internal defects, followed by MT or PT for surface defects. This approach significantly improves accuracy and reliability, effectively avoiding missed or misjudged defects due to the limitations of a single method.
Conclusion
As critical components in industrial manufacturing, the quality and safety of forgings are essential. By thoroughly understanding the forging process and common defects, mastering the principles and characteristics of various inspection methods, and selecting appropriate comprehensive inspection strategies based on practical conditions, the quality and safety of forgings can be effectively ensured, providing a solid foundation for stable industrial operations. With continuous technological progress, inspection techniques are constantly developing and improving, and it is believed that more efficient methods will be applied in the future to ensure the safety and quality of industrial manufacturing.
Send your message to this supplier
Related Articles from the Supplier
Critical Methods for Forging Defect Detection
- Nov 19, 2025
Related Articles from China Manufacturers
Related Products Mentioned in the Article
Supplier Website
Source: https://www.forging-casting-stamping.com/critical-methods-for-forging-defect-detection.html

